
This week I though I'd show you how to make a handmade card. In the digital world the art of writing to people is getting forgotten about but for me writing to friends bring me so much joy. I love creating letters and cards unique to my friends likes and interests. So my challenge for you is when you've made this card is to send it to in the post to a friend to bring them a little joy too.

Materials
- Blank card and envelope - any size of your choice, for this on I used a 4"x4" card but I've made these card other sizes
- Acetate - you can either use card making acetate or the acetate that comes in packaging as it does the job just as well and this is what I mostly use
- Quote/message stamp - if you don't have this you could hand letter a message or quote
- Ink pad or if you wish you could emboss your message
- Thin double sided sticky tape
- Glue - glue stick or liquid glue
- 3D sticky pads
- Patterned card/paper
- Pencil
- Rubber
- Ruler
Step 1
Select the size of card you want to make.
Measure the size of the stamp you want to use so you will know how much area you need to cut out of your card.
 |
| Image 1 |
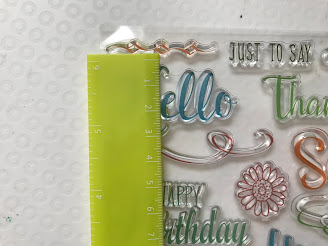 |
| Image 2 |
Step 2
From the size of the stamp work out how much you need to cut out of the centre of the card front. Cut out this centre piece so it will look like image 2.
 |
| Image 3 |
 |
| Image 4 |
Step 3
Work out how much acetate you need ensuring you have enough overlap and ensure your double sided sticky tape will not overlap on the cut out section. Cut your acetate to size.
Using double sided sticky tape stick the acetate at the top and the bottom and stick your acetate to the front of the card.
 |
| Image 5 |
 |
| Image 6 |
Step 4
Using your ruler work out the space where you need to place your stamp (I find it helpful to draw a faint line as shown in image 1 to know where to place my stamp.
Place ink on your stamp and stamp onto the side where you will write your card.
 |
| Image 7 |
Step 5
Decorate the front of your below and above the acetate window in anyway you wish. For this card I have used the Rose Gold Collection paper pad.
Measure out and make a rectangular piece to attach to your card. Place on the back of this rectangular piece 3D sticky pads.
 |
| Image 8 |
 |
| Image 9 |
Step 6
Place the rectangular piece of the card as shown in the image below and now you are done! You can practice different styles and sizes if you wish like this time for this tutorial I used a square card and my scalloped edged scissors.
The image at the top of this tutorial might help give you some ideas.
 |
| Image 10 |
No comments:
Post a Comment