Tuesday 27 October 2020

Public Health, Not Public Shaming - A Campaign by Beat

Beat is the UK's leading charity that supports those with eating disorders and those that support them such as family and friends as well as professionals.

Beat's new campaign 'Public Health, Not Public Shaming' is around the new governments announcement in a plan to encourage weight loss. Now whilst this is a good thing to help get the public more healthy and making better decisions about their health which will improve health and wellbeing. It will also in turn ease the strain unhealthy lifestyles have on the NHS.

The new measures laid out by the government include introducing a weight loss app and also increasing the publication of calorie labelling in places such as cafés, restaurants and takeaways and fast-food outlets. Whilst this is good, what I feel is missing is the public education of what is a "healthy" amount of calories to consume when browsing the menu - a bit like how the traffic light system works on food labels with green being a healthy amount of calories and red being a high amount of calories in that portion so people will understand and consider consumption of that particular food item.

What I also feel is also missing is the consideration of the many people in UK who are living with and trying to remain in recovery from an eating disorder.

I've written here on my blog before about my own experience of anorexia and now even though I am in a well state of recovery from my eating disorder even I can struggle at times. Eating out can still be a stressful situation for me and faced with the numbers [calories] on the menu it may possibly leave me feeling rather flustered when choosing what to eat.

Now I'm in a much better place to manage my eating disorder but if I where to take myself back 10 years I found eating publicly challenging enough without being faced by calories on the menu even when looking at my list of safe go-to foods and knowing that there where apps for weight loss defiantly would trigger my spiral downwards aiding my anorexia.

Previous Government anti-obesity campaigns have been ineffective in reducing obesity. However they have increased stigma, and have put those vulnerable to developing an eating disorder or those currently experiencing an eating disorder at risk. 
As one eating disorder sufferer highlighted: “My eating disorder makes me, and many others, susceptible to taking these messages to the extreme.” 
Beat recognises the importance of reducing obesity, but it is vital that the public are not shamed into losing weight in an attempt to solve this problem.. - Beat

Update

Since starting to write this blog post there has been n update from Beat in regards to the Public Health England's planned weight loss app.
"Public Health England have now taken steps to update the app to help ensure that people with eating disorders and people who may be vulnerable to eating disorders do not use the app." - Beat

The flaws with the app are still that those under 18 and those underweight could still use the app and knowing from my own experience of having anorexia you become a great deceiver and when there is a will there is a way. So on the app you could possibly falsify your age or BMI/weight to still be able to use the app and even if you are stopped from using that app there are probably many other apps that can be used in its place.

Help for Eating Disorders

If you or someone you care about are concerned bout eating disorders, (and remember you don't have to be underweight to struggle with one) you can always initially speak with your GP or contact Beat.and look at their resources on ther website to better understand eating disorders, the different types of eating disorders and spotting the signs that someone my have an eating disorder. Beat's website can be found here.

Beat also have a helpline

📞 Helpline - 0808 801 0677
📞 Studentline - 0808 801 0811
📞 Youthline - 0808 801 0711

The helplines are open every day of the year 
9am - 8pm during the week 
4pm -8pm at the weekend and on bank holidays

→ Calls to this helpline are free from landlines and mobile phones within the UK and do not appear on itemised bills

There is also a 1:1 web chat if you are unable to get through on the phone.

Alternatively you can email

Adult support email inc concerned adults/parents or professionals e.g. school staff


Student line


Under 18's Youthline

💻 fyp@beateatingdisorders.org.uk 


Purple background with the Beat orange, purple, red, turquoise logo and below in turquoise text is the hashtag Public Health not Public Shaming

Tuesday 20 October 2020

What's in my make-up bag?

So in putting this post together I came to realise how much makeup I own (most has come through my monthly Birchbox's). Subscribing to Birchbox over the years defiantly has increased both my interest in makeup, my makeup collection and also how adventurous I am now with trying out new shades and products. 

Here is some of my favourite products as well as what I'd put into my essential's makeup bag like for instance some of the makeup products I had with me when I was in hospital earlier this year.

So, what I'll do in this post is tell you about the products photographed above as well as some of the brands of makeup I like. If I'm buying makeup for myself (i.e. not what comes in my Birchbox's) I do go for cruelty free products/brands and those that are ethically sourced and vegan. 


So starting off I have: 

Basics: 

Primer... This is by one of my favourite brands Barry M as they're have some great products that are well priced within my personal budget for makeup and they're also cruelty free. This primer is actually a 'Beauty Elixir' with vitamins and minerals and I'd defiantly recommend it. When I bought it I was stuck between this and the 'Unicorn Primer Drops' so I may go for that next time.

Foundation... I always find it so hard to find the right shade for my skin so I hope Barry M will continue to sell this product for when I next need to buy a foundation as this one is just the right shade and the wear is long lasting. I used to put foundation on with a brush but after watching some videos on YouTube I now use a sponge. In my Birchbox I got a teardrop shaped sponge by Spectrum. I used to avoid makeup sponges because of my latex allergy but this one is latex free and it blends in my foundation so much better.

Fixing powder... This is another Barry M new edition to my makeup bag. I used to use multicoloured pearls but (a) I'd had them a while and (b) they just weren't doing the job. This also really helps to set my foundation in place and give an even matte look to my foundation. On no makeup days when I have oily skin a tip I've learnt from my stepmum is to pat a bit of talc on my face and it's a tip I'd highly recommend.

Eyes:

Eyeshadow etc... For eyes I love Revolution's eyeshadow palette's and I have to resist the urge to buy more when I see ones I like. I also have a liquid eyeshadow in a rose gold tone that I got in my Birchbox that I love and the mini palette that I keep in my essentials make bag as it has a nice but simple variety of shades some sparkly some matte. I also love Barry M's really fine eye glitter and their holographic eyeshadow topper too. I've also gotten into using eyeshadow crayons too.
On a basic makeup look I'll just use on colour but if I have the time and and energy I've been trying different looks like smoky eye and crease cut eyeshadow looks.
Lashes...  On my lashes I used a tined primer and on my top lashes I'll go over with mascara.
Eyebrows... On a basic make-up day I tend to leave my eyebrows, occasionally I may put on my eyebrow mascara. If I putting more effort into my makeup I'll use a pencil.
Eye liner... Occasionally I'll put on eyeliner; I use to always wear it. I quite like gel eyeliner that I put on with a brush and I have some eyeliner pens too. I also like to use eyeshadow as an eyeliner quite often.

Lips:

I generally match with what I'm wearing. I've discovered that I quite like matte lips and also crayons. Through Birchbox they've defiantly gotten me more adventurous with what colours I'd use.

Cheeks:

I like traditional powders but I also have a blush crayon I got in a Birchbox a while ago which I love.
On basic looks I just go for a sweep of colour but if I going for a fuller look I like to use highlighter. I either use a stick or I'm quite liking a liquid highlighter I got again in one of my Birchbox's and I find it easier to blend into my skin and I love the glow and shimmer highlighter gives.
I'm also experimenting with bronzer and learning how contour. 

You Tube Video: What's Inside my Makeup Bag...?


Tuesday 13 October 2020

Staying connected

Handful of colourful postcards being posed into a red Royal Mail letterbox

Staying connected is really important. When you're mostly housebound it's so easy to feel isolated from the out outside world but with the way the world is now what with the coronavirus situation it's important for all of us to stay connected. 

Many of us will be missing friends and family whether they live close by or at a distance. There are many ways to stay connected: talking on the phone, sending a text, via a video call, email, social media or my personal favourite which is sending mail in the post.

If there's someone you haven't been in touch with for a while or a friend you know who's having a difficult time my challenge to you is get in touch with them to let them know that you're thinking of them. Small acts of kindness like thins can go a long way. I know it does for me when I hear from someone I haven't heard from in a while or receive a letter on a day when I really need a reason to smile.

Keeping connected is key to our wellbeing. Most people will automatically think of this as keeping connected socially but it's important to stay connected with ourselves too.

Make a habit of checking in with yourself. Ask yourself how you are feeling and don't feel guilty for taking time out for yourself. This may be turning your phone off for an evening, or having a bath, painting your nails, doing some colouring, whoever makes you smile inside.

Thursday 1 October 2020

October's Monthly Make - Acetate Handmade Card

This week I though I'd show you how to make a handmade card. In the digital world the art of writing to people is getting forgotten about but for me writing to friends bring me so much joy. I love creating letters and cards unique to my friends likes and interests. So my challenge for you is when you've made this card is to send it to in the post to a friend to bring them a little joy too.

A selection of four cards all decorated very differently but made in the same style as given in this tutorial.

Materials

  • Blank card and envelope - any size of your choice, for this on I used a 4"x4" card but I've made these card other sizes
  • Acetate - you can either use card making acetate or the acetate that comes in packaging as it does the job just as well and this is what I mostly use
  • Quote/message stamp - if you don't have this you could hand letter a message or quote
  • Ink pad or if you wish you could emboss your message
  • Thin double sided sticky tape
  • Glue - glue stick or liquid glue 
  • 3D sticky pads
  • Patterned card/paper
  • Pencil
  • Rubber
  • Ruler

Step 1

Select the size of card you want to make. 
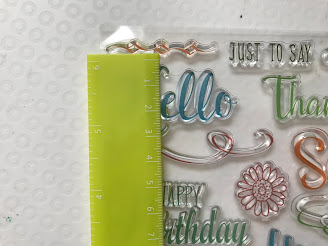
Measure the size of the stamp you want to use so you will know how much area you need to cut out of your card.

A white square card front
Image 1
A green ruler next to a stamp taking a measurement of the height of the stamp
Image 2
  

Step 2

From the size of the stamp work out how much you need to cut out of the centre of the card front. Cut out this centre piece so it will look like image 2.


A green ruler and pencil with an open white square card and two pencil lines on the card
Image 3
Front of a white square card slightly open with a middle section cut out across the card
Image 4
 

Step 3

Work out how much acetate you need ensuring you have enough overlap and ensure your double sided sticky tape will not overlap on the cut out section. Cut your acetate to size. 
Using double sided sticky tape stick the acetate at the top and the bottom and stick your acetate to the front of the card.

A piece of acetate laying of the top of a white square card front that has a middle section cut out of it
Image 5
A piece of acetate stuck to the front of a white square card covering the middle cut out section
Image 6
 

Step 4

Using your ruler work out the space where you need to place your stamp (I find it helpful to draw a faint line as shown in image 1 to know where to place my stamp.
Place ink on your stamp and stamp onto the side where you will write your card.

An open square card and on the inside is stamped the word 'hello'
Image 7

Step 5

Decorate the front of your below and above the acetate window in anyway you wish. For this card I have used the Rose Gold Collection paper pad.
Measure out and make a rectangular piece to attach to your card. Place on the back of this rectangular piece 3D sticky pads.

Front of a square card. In the middle is a cut out section with acetate and you can see the stamped 'hello'. Above the acetate it is now decorated with pink and white patterned paper with rose gold dots. Below the acetate is a pink and rose gold glitter floral patterned paper. Next to this is a thin rectangle of card which has an cream order and a geometric pattern of pink and rose gold paper.
Image 8
Front of a square card. In the middle is a cut out section with acetate and you can see the stamped 'hello'. Above the acetate it is now decorated with pink and white patterned paper with rose gold dots. Below the acetate is a pink and rose gold glitter floral patterned paper. Next to this is a thin rectangle of cream card which has 3D sticky pads stuck to the top and bottom.
Image 9
 

Step 6

Place the rectangular piece of the card as shown in the image below and now you are done! You can practice different styles and sizes if you wish like this time for this tutorial I used a square card and my scalloped edged scissors.
The image at the top of this tutorial might help give you some ideas.

Front of a square card. In the middle is a cut out section with acetate and you can see the stamped 'hello'. Above the acetate it is now decorated with pink and white patterned paper with rose gold dots. Below the acetate is a pink and rose gold glitter floral patterned paper. on the right side of the card is stuck a thin rectangle of card which has an cream border and a geometric pattern of pink and rose gold paper.
Image 10