Sunday, 1 November 2020

November's Monthly Make - Crochet Can Cosy with video

This is a patterned that I actually created myself. It's a spiral pattern so there's no need to join each round making a nice seamless can cosy. You could just use a single colour, or use different coloured yarns to create a stripe effect - I made a nice cosy using up scraps of different yarns. I also made a lovely mini cosy for the mini drinks cans using multicoloured yarn.

At the bottom you will find my YouTube video tutorial on how to make this Can Cosy and it's great for beginners as I explain how to make loop, create chains and the different stitches etc.

Difficulty level ★☆☆☆ Beginner


What you need

  • 4mm yarn
  • 4mm crochet hook
  • Stitch marker (or alternatively a safety pin or paperclip will do)
  • Scissors
  • Yarn needle

Abbreviations

  • CH = Chain
  • SC = Single crochet
  • BLSC = Back loop single crochet
  • SLST = Slip stitch

How to make your Can Cosy

This is a spiral pattern so at the end of each round you don't SLST to end the round

Step 1

Make a loop and CH 3

Step 2

Into the fist CH make 12 SC

Step 3

In the next stitch space make 1 SC, place your stitch marker in this stitch.
In the same stitch space make a second SC. Go around and create 2 SC as you go around.
Continue until you have created 24 stitches in total; this will bring you round to the stitch marker.

Step 4

Remove your stitch marker.
In the next stitch space make 1 SC, place your stitch marker in this stitch.
In the same stitch space make a second SC. In the next stitch space make 1 SC; then the next stitch space make 2SC. 
Continue this pattern of 2-12-1 until you have created 36 stitches in total; this will bring you round to the stitch marker.

Step 5

Remove your stitch marker
In the next stitch make 1 BLSC, continue and go around your spiral making 36 BLSC in total.

Step 6

You are now ready to start building your cup shape for your Can Cosy.
You now don't need to count your stitches anymore.
In the next stitch space make 1 SC, continue going around in a spiral making 1 SC in each stitch space.
A cup shape will begin to form. Carry on crocheting around until you have your desired height of Can Cosy.

To finish

Once you have your reached the desired height of your Can Cosy stop making SC. in the next stitch space make a SLST.
Cut off your yarn and weave in your yarn ends using your yarn needle 

Voilá, you have finished your Can Cosy. Now all you need to do is pop in your can, open it and sit back and enjoy.


Tuesday, 27 October 2020

Public Health, Not Public Shaming - A Campaign by Beat

Beat is the UK's leading charity that supports those with eating disorders and those that support them such as family and friends as well as professionals.

Beat's new campaign 'Public Health, Not Public Shaming' is around the new governments announcement in a plan to encourage weight loss. Now whilst this is a good thing to help get the public more healthy and making better decisions about their health which will improve health and wellbeing. It will also in turn ease the strain unhealthy lifestyles have on the NHS.

The new measures laid out by the government include introducing a weight loss app and also increasing the publication of calorie labelling in places such as cafés, restaurants and takeaways and fast-food outlets. Whilst this is good, what I feel is missing is the public education of what is a "healthy" amount of calories to consume when browsing the menu - a bit like how the traffic light system works on food labels with green being a healthy amount of calories and red being a high amount of calories in that portion so people will understand and consider consumption of that particular food item.

What I also feel is also missing is the consideration of the many people in UK who are living with and trying to remain in recovery from an eating disorder.

I've written here on my blog before about my own experience of anorexia and now even though I am in a well state of recovery from my eating disorder even I can struggle at times. Eating out can still be a stressful situation for me and faced with the numbers [calories] on the menu it may possibly leave me feeling rather flustered when choosing what to eat.

Now I'm in a much better place to manage my eating disorder but if I where to take myself back 10 years I found eating publicly challenging enough without being faced by calories on the menu even when looking at my list of safe go-to foods and knowing that there where apps for weight loss defiantly would trigger my spiral downwards aiding my anorexia.

Previous Government anti-obesity campaigns have been ineffective in reducing obesity. However they have increased stigma, and have put those vulnerable to developing an eating disorder or those currently experiencing an eating disorder at risk. 
As one eating disorder sufferer highlighted: “My eating disorder makes me, and many others, susceptible to taking these messages to the extreme.” 
Beat recognises the importance of reducing obesity, but it is vital that the public are not shamed into losing weight in an attempt to solve this problem.. - Beat

Update

Since starting to write this blog post there has been n update from Beat in regards to the Public Health England's planned weight loss app.
"Public Health England have now taken steps to update the app to help ensure that people with eating disorders and people who may be vulnerable to eating disorders do not use the app." - Beat

The flaws with the app are still that those under 18 and those underweight could still use the app and knowing from my own experience of having anorexia you become a great deceiver and when there is a will there is a way. So on the app you could possibly falsify your age or BMI/weight to still be able to use the app and even if you are stopped from using that app there are probably many other apps that can be used in its place.


Help for Eating Disorders

If you or someone you care about are concerned bout eating disorders, (and remember you don't have to be underweight to struggle with one) you can always initially speak with your GP or contact Beat.and look at their resources on ther website to better understand eating disorders, the different types of eating disorders and spotting the signs that someone my have an eating disorder. Beat's website can be found here.

Beat also have a helpline

📞 Helpline - 0808 801 0677
📞 Studentline - 0808 801 0811
📞 Youthline - 0808 801 0711

The helplines are open every day of the year 
9am - 8pm during the week 
4pm -8pm at the weekend and on bank holidays

→ Calls to this helpline are free from landlines and mobile phones within the UK and do not appear on itemised bills

There is also a 1:1 web chat if you are unable to get through on the phone.

Alternatively you can email

Adult support email inc concerned adults/parents or professionals e.g. school staff


Student line


Under 18's Youthline

💻 fyp@beateatingdisorders.org.uk 


Purple background with the Beat orange, purple, red, turquoise logo and below in turquoise text is the hashtag Public Health not Public Shaming

Tuesday, 20 October 2020

What's in my make-up bag? (with video)

So in putting this post together I came to realise how much makeup I own (most has come through my monthly Birchbox's). Subscribing to Birchbox over the years defiantly has increased both my interest in makeup, my makeup collection and also how adventurous I am now with trying out new shades and products. 

Here is some of my favourite products as well as what I'd put into my essential's makeup bag like for instance some of the makeup products I had with me when I was in hospital earlier this year.

So, what I'll do in this post is tell you about the products photographed above as well as some of the brands of makeup I like. If I'm buying makeup for myself (i.e. not what comes in my Birchbox's) I do go for cruelty free products/brands and those that are ethically sourced and vegan. 


So starting off I have: 

Basics: 

Primer... This is by one of my favourite brands Barry M as they're have some great products that are well priced within my personal budget for makeup and they're also cruelty free. This primer is actually a 'Beauty Elixir' with vitamins and minerals and I'd defiantly recommend it. When I bought it I was stuck between this and the 'Unicorn Primer Drops' so I may go for that next time.

Foundation... I always find it so hard to find the right shade for my skin so I hope Barry M will continue to sell this product for when I next need to buy a foundation as this one is just the right shade and the wear is long lasting. I used to put foundation on with a brush but after watching some videos on YouTube I now use a sponge. In my Birchbox I got a teardrop shaped sponge by Spectrum. I used to avoid makeup sponges because of my latex allergy but this one is latex free and it blends in my foundation so much better.

Fixing powder... This is another Barry M new edition to my makeup bag. I used to use multicoloured pearls but (a) I'd had them a while and (b) they just weren't doing the job. This also really helps to set my foundation in place and give an even matte look to my foundation. On no makeup days when I have oily skin a tip I've learnt from my stepmum is to pat a bit of talc on my face and it's a tip I'd highly recommend.

Eyes:

Eyeshadow etc... For eyes I love Revolution's eyeshadow palette's and I have to resist the urge to buy more when I see ones I like. I also have a liquid eyeshadow in a rose gold tone that I got in my Birchbox that I love and the mini palette that I keep in my essentials make bag as it has a nice but simple variety of shades some sparkly some matte. I also love Barry M's really fine eye glitter and their holographic eyeshadow topper too. I've also gotten into using eyeshadow crayons too.
On a basic makeup look I'll just use on colour but if I have the time and and energy I've been trying different looks like smoky eye and crease cut eyeshadow looks.

Lashes...  On my lashes I used a tined primer and on my top lashes I'll go over with mascara.

Eyebrows... On a basic make-up day I tend to leave my eyebrows, occasionally I may put on my eyebrow mascara. If I putting more effort into my makeup I'll use a pencil.

Eye liner... Occasionally I'll put on eyeliner; I use to always wear it. I quite like gel eyeliner that I put on with a brush and I have some eyeliner pens too. I also like to use eyeshadow as an eyeliner quite often.


Lips:

I generally match with what I'm wearing. I've discovered that I quite like matte lips and also crayons. Through Birchbox they've defiantly gotten me more adventurous with what colours I'd use.

Cheeks:

I like traditional powders but I also have a blush crayon I got in a Birchbox a while ago which I love.
On basic looks I just go for a sweep of colour but if I going for a fuller look I like to use highlighter. I either use a stick or I'm quite liking a liquid highlighter I got again in one of my Birchbox's and I find it easier to blend into my skin and I love the glow and shimmer highlighter gives.
I'm also experimenting with bronzer and learning how contour. 

You Tube Video: What's Inside my Makeup Bag...?

Tuesday, 13 October 2020

Staying connected

Handful of colourful postcards being posed into a red Royal Mail letterbox

Staying connected is really important. When you're mostly housebound it's so easy to feel isolated from the out outside world but with the way the world is now what with the coronavirus situation it's important for all of us to stay connected. 

Many of us will be missing friends and family whether they live close by or at a distance. There are many ways to stay connected: talking on the phone, sending a text, via a video call, email, social media or my personal favourite which is sending mail in the post.

If there's someone you haven't been in touch with for a while or a friend you know who's having a difficult time my challenge to you is get in touch with them to let them know that you're thinking of them. Small acts of kindness like thins can go a long way. I know it does for me when I hear from someone I haven't heard from in a while or receive a letter on a day when I really need a reason to smile.

Keeping connected is key to our wellbeing. Most people will automatically think of this as keeping connected socially but it's important to stay connected with ourselves too.

Make a habit of checking in with yourself. Ask yourself how you are feeling and don't feel guilty for taking time out for yourself. This may be turning your phone off for an evening, or having a bath, painting your nails, doing some colouring, whoever makes you smile inside.

Thursday, 1 October 2020

October's Monthly Make - Acetate Handmade Card

This week I though I'd show you how to make a handmade card. In the digital world the art of writing to people is getting forgotten about but for me writing to friends bring me so much joy. I love creating letters and cards unique to my friends likes and interests. So my challenge for you is when you've made this card is to send it to in the post to a friend to bring them a little joy too.

A selection of four cards all decorated very differently but made in the same style as given in this tutorial.

Materials

  • Blank card and envelope - any size of your choice, for this on I used a 4"x4" card but I've made these card other sizes
  • Acetate - you can either use card making acetate or the acetate that comes in packaging as it does the job just as well and this is what I mostly use
  • Quote/message stamp - if you don't have this you could hand letter a message or quote
  • Ink pad or if you wish you could emboss your message
  • Thin double sided sticky tape
  • Glue - glue stick or liquid glue 
  • 3D sticky pads
  • Patterned card/paper
  • Pencil
  • Rubber
  • Ruler

Step 1

Select the size of card you want to make. 
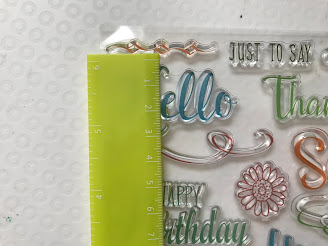
Measure the size of the stamp you want to use so you will know how much area you need to cut out of your card.

A white square card front
Image 1
A green ruler next to a stamp taking a measurement of the height of the stamp
Image 2
  

Step 2

From the size of the stamp work out how much you need to cut out of the centre of the card front. Cut out this centre piece so it will look like image 2.


A green ruler and pencil with an open white square card and two pencil lines on the card
Image 3
Front of a white square card slightly open with a middle section cut out across the card
Image 4
 

Step 3

Work out how much acetate you need ensuring you have enough overlap and ensure your double sided sticky tape will not overlap on the cut out section. Cut your acetate to size. 
Using double sided sticky tape stick the acetate at the top and the bottom and stick your acetate to the front of the card.

A piece of acetate laying of the top of a white square card front that has a middle section cut out of it
Image 5
A piece of acetate stuck to the front of a white square card covering the middle cut out section
Image 6
 

Step 4

Using your ruler work out the space where you need to place your stamp (I find it helpful to draw a faint line as shown in image 1 to know where to place my stamp.
Place ink on your stamp and stamp onto the side where you will write your card.

An open square card and on the inside is stamped the word 'hello'
Image 7

Step 5

Decorate the front of your below and above the acetate window in anyway you wish. For this card I have used the Rose Gold Collection paper pad.
Measure out and make a rectangular piece to attach to your card. Place on the back of this rectangular piece 3D sticky pads.

Front of a square card. In the middle is a cut out section with acetate and you can see the stamped 'hello'. Above the acetate it is now decorated with pink and white patterned paper with rose gold dots. Below the acetate is a pink and rose gold glitter floral patterned paper. Next to this is a thin rectangle of card which has an cream order and a geometric pattern of pink and rose gold paper.
Image 8
Front of a square card. In the middle is a cut out section with acetate and you can see the stamped 'hello'. Above the acetate it is now decorated with pink and white patterned paper with rose gold dots. Below the acetate is a pink and rose gold glitter floral patterned paper. Next to this is a thin rectangle of cream card which has 3D sticky pads stuck to the top and bottom.
Image 9
 

Step 6

Place the rectangular piece of the card as shown in the image below and now you are done! You can practice different styles and sizes if you wish like this time for this tutorial I used a square card and my scalloped edged scissors.
The image at the top of this tutorial might help give you some ideas.

Front of a square card. In the middle is a cut out section with acetate and you can see the stamped 'hello'. Above the acetate it is now decorated with pink and white patterned paper with rose gold dots. Below the acetate is a pink and rose gold glitter floral patterned paper. on the right side of the card is stuck a thin rectangle of card which has an cream border and a geometric pattern of pink and rose gold paper.
Image 10

Tuesday, 22 September 2020

H.O.P.E - Hold On Pain Ends

Pale purple background. Photograph of a woman hunched over the legs in bed. September in purple handwritten font and then more text reading is Pain Awareness Month

Pain is unfortunately something I'm all too familiar with, I live in a constant level of pain on a daily basis; I can't tell you what it's like to be pain free anymore. Some days the pain is more tolerable than other days but it still affects me a lot in terms of what I am and am not able to do. 

Looking back I've lived with pain to some degree my whole life. As a child I was in pain a lot due to my spinal curvature. Often my pain then was dismissed as being 'just growing pain' rather than my pain and other symptoms being properly investigated and maybe if they had some of the diagnosis' I now have would have been given to me sooner maybe?

I take medication to manage my pain but it only brings my pain down to a manageable level to allow me to function on a basic level, but even then I am limited and still in some level pain and at times have to take extra breakthrough pain relief medication. I call my medication 'pain relief' because that what it is: it reliefs my pain as opposed to it killing and eradicating my pain. As well as regular and as and when needed pain relief medication my pain (amongst other symptoms) makes me feel constantly nauseous so I have to take medication to ease that too.

Pain comes in many forms: spasms, cramps, neuropathic symptoms like intense tingling/buzzing sensations, stabbing pains, headaches/migraines, gastrointestinal pain, stiffness, joint pain, torn ligament pain (often following a dislocation), sprains, acute pain, background pain, throbbing, tenderness, soreness, griping, generalised pain, - the list goes on.

Pain is something that is hard describe, especially chronic pain. Most people are familiar with the pain of a stubbed toe or maybe a broken bone but when you are relentlessly in pain throughout your whole body it is completely something else.

Being in constant pain not only affects me physically through my limitations - having to be careful for example due to the risk of exacerbating my pain or causing a joint to subluxations/dislocate or doing something that will increase my fatigue levels which doesn't help with my pain levels (as with M.E when I'm exhausted the Post Exertion Neuro-immune Exhaustion rockets up my pain levels) as well as avoiding things that will flare up a migraine. High pain levels are also a trigger for my non-epileptic seizures too.
My pain also affects me emotionally and every so often it wears me down to breaking point. There are many times when I have just cried because of how relentless my pain is especially when I have exhausted my list of pain management tools and I just feel like I can't take it [my pain] and my other health problems any more and I don't feel able to carry on.. Then it [the pain amongst other things] affects you socially. Many plans get cancelled or cut short because my body just simply has other ideas and seeing a friend even at home would be too much for my body to handle.

I've learnt to live with pain and when my pain levels are high often I've found that when I give my pain score I'm not as well believed because I'm not screaming (which would probably only exacerbate my pain) or having a complete breakdown. I've learnt that the best thing to handle my high levels of pain is to try and distract myself - easier said than done. I can tell you I know me and my pain well enough to know how best to handle it, but if I'm say for example in hospital and I'm in a lot of pain I find a lot of the time I'm having to explain and justify myself as to why I need high dose medications when I'm not screaming or having a meltdown. Those things just don't work. I don't take medication lightly but I know myself well enough for when I do need it and I will always ask for it to be stepped up.

I wanted to end this on a positive note as much as I can do when it comes to chronic pain. You can learn to live with pain and there are many things out there to try. Everyone's "pain toolkit" is different and what works for one person may not work for you and that's okay, it's just a case of learning what works for you. For me yes medication does help but I'm also a big believer in non-pharmaceutical alternatives to go alongside my medication. For example gentle movements if possible, my TENS machine, a hot water bottle, magnesium oil, massages, meditation/mindfulness, distraction, grounding myself amongst other things like using a wheelchair helps. I've also found pacing helps and setting a timer on activities so I don't overdo it and crash. helps too. I personally have a set schedule for the day alternating between activity and rest periods with times for meals, getting ready for the day and doing my main bit of physiotherapy and having this routine helps (I devised this with my Occupational Therapist in hospital). Getting a good nights sleeps helps too.

When you're in pain and it seems never ending, but remember the time when you pain has been at it's worse and even though it was really hard you managed to get through it.  H.O.P.E: Hold On Pain Ends 

If you are struggling with pain speak with your doctor such as you GP or consultant as there are things that they may be able to do for you whether this be medication or making a referral to a pain clinic or for physiotherapy. You don't have to struggle alone.

Tuesday, 15 September 2020

Birchbox Review: Blooming Lovely Box

A metal tin with a floral pattern on. In front of the tine are beauty products including a spray bottle with a pink liquid in, a tube of hair conditioner, a turquoise mascara, a bottle of pink nail polish, a face mask packet and a paper booklet with 'Blooming Lovely' written on the front.

What I loved about this edition is that it came in a lovely tin and I was eager to try out the products and I was happy to see some more eco-friendly products in this edition.

I'm now using the tin in my bathroom to keep my face products neat and tidy.

(Products from led to right)

Rose Water Facial Mist

Grace & Stella

I like the rose scent to this but I didn't really feel like it hydrated my skin but it did feel refreshed. After a few uses though I did start to feel the benefits and my skin felt more hydrated. Personally I find it nice to use as a toner so I'll soapy it after washing my face. I'll spray it on and pat it on my face and let it soak in and then I'll apply some moisturiser. One downside is that the spray nozzle could do which having more of a misting effect.

Argon Oil & Marula Conditioner

Luxliss

When my Dad washed my hair one of the first things he said about it was how nice this conditioner smelt. When it was wet it felt lovely and smooth and once it was dried my hair was so lush and shiny. My hair only gets washed once a week and I can honestly say that for the whole week my hair remained in great condition; it hardly got that 'my hair needs washing' look and it remained silky and smooth.

Bloom Mascara

Manna Kadar

I haven't tried this product as I don't want to open it until I've finished my current mascara.

Green Nail Lacquer in 'Angel's Trumpet'

Manucurist

This is a lovely colour on my nails and a very 'me' colour. Two coats and you have a nice solid colour on your nails and it goes on really well.

The company has designed this product to be as natural as possible with a '9-free formula' which mean that they avoid 9 toxic ingredients like formaldehyde and toluene and opting instead for botanical alternative such as bamboo extract and cane sugar. To be honest I couldn't;t tell the difference between this polish and my others other than the scent of this one doesn't have this typical nail polish smell which is probably because of this 9-free formula.

It's defiantly a brand I would look for in the future and look into more. I will also see if they have created a nail polish remover and if they don't I would like to suggest to the if they could come up with one.

Rose Infused Sheet Mask

BeautyPro

I love this face mask. the floral scent was lovely and my skin felt so much better when I took it off and I didn't need to use moisturiser. Even at the end of the day my skin was still feeling the benefits. I also love the fact that this product was plant based and vegan and that the mask itself was biodegradable and made from bamboo which is more sustainable for the planet which are all things that are important to me. I would defiantly recommend and purchase this product other for myself or as a gift.

Tuesday, 1 September 2020

September Monthly Make - Wire Ring with video

This month I thought I'd show you how to make a simple wire ring. In the YouTube video I've put links to places where I but my basic supplies. If you want to give it a go it would cost much to buy the start-up materials to see if you enjoy it and then you can invest in more beads and different wires - that's what I did. I'd just buy some basic 3-in-1 mini pliers, silver wire and a small selection of beads.

(Some beads can be bought in my Etsy shop too - more to come with a discount code for views of my blog coming soon) so subscribe to my blog to see when I publish that discount code. Normally I'm more organised with my blog and Monthly Makes but this make I've been working on it all day as I didn't want to miss it as I realised that I didn't publish a post on Tuesday (life and health has just gotten int he way recently), but I'm working on some draft posts to set up to auto-publish each Tuesday as a while back I seemed to have collected enough draft posts to publish weekly and I want to try and keep up with that.

The camera work on this tutorial isn't great but hopefully it will show you enough to show you how to make a simple ring. If you would like to see some different styles of wire rings on my YouTube just leave a comment on YouTube. There are other craft tutorials on YouTube too and if you subscribe to my channel it will keep you up-to-date with new videos.

Happy crafting!

Tuesday, 18 August 2020

50 Things to put into a letter

There's nothing better than getting create and writing a letter to a friend and I love putting little extras into my letters as a little surprise for when they receive it.

So here is a list of a few ideas you can create to pop into an envelope next time you write to someone.
  1. Write a 'mail tag' asking your pen pals questions about themselves
  2. A mini quiz on a favourite topic of your pen pal's
  3. Write a mini playlist of songs or TV programs 
  4. A mini envelope with a little message inside
  5. A teabag, coffee sachet or hot chocolate sachet (don't send these internationally)
  6. Origami
  7. Word puzzles - I personally like to make up my own word searches but I also sometimes put in a page from a puzzle book or a sudoko or occasionally I've printed things like mazes
  8. Have a game of noughts and crosses between your pen pal
  9. Another pen pals of mine also recently put in a game of 4-in-a-row which was quite fun
  10. Colouring in pages. I bought a mini colouring book and that was really good to pop into letters. Sometimes on repetitive patterns I also cut out a smaller section of the page
  11. Quotes - either ones you've found online or one you've hand lettered
  12. A poem
  13. A jazzy paperclip - Pinterest has lots of ideas to make ones yourself with ribbon or washi tap
  14. Washi tape samples
  15. Samples of some stickers
  16. Diary or planner stickers
  17. A postcard of where you live or from a recent day out or holiday or one you've made yourself or acquired
  18. Photographs for example  this could be of somewhere you live, your pet, a recent holiday snap etc
  19. Funky post-it notes or page makers post-its
  20. A bookmark - some ideas could be to make an origami bookmark or handmade one yourself or one you've acquired and would like to share with your pen pal
  21. A bracelet you've made
  22. Write 'top 10 list' such as your top ten books, films, songs etc
  23. Random facts
  24. A ticket of somewhere you've been recently such as a tourist attraction, the theatre or the cinema
  25. A packet of flower seeds (don't send these internationally)
  26. A small piece of crochet or knitting such as a small crochet star or flower or reusable cotton pad
  27. Something you've made such as a hair scrunchie, lavender pillow, earring, a ring or a piece of weaving (check what you can send internationally)
  28. A coaster
  29. Cosmetics or toiletries samples like a body lotion packet sample (check what you can send internationally)
  30. A comic strip or clip from a newspaper
  31. Coins
  32. Interesting or unusual stamps or airmail stickers
  33. A drawing or doodle
  34. A map of where you live or somewhere you've been
  35. A sentence story game - you write the first part of a story and fold it over and your pen pal will write the next sentence of the story and fold it over to return to you to continue the game
  36. Similar to the sentence story game this one you draw a picture or a person or creature - the first part is to draw the head and neck, then the next person draws the arms and torso, your pen pal returns it to you to draw the waist and knees and finally you return it to your penal to draw the knees and feet
  37. A small sweet (don't send these internationally)
  38. Paper confetti
  39. Gift tags
  40. A recipe
  41. Letter writing paper and/or and envelope
  42. Iron-on patches
  43. Magnets
  44. Button badges
  45. If your pen pals keeps a scrapbook or journal you could send them some bits for their scrapbook or journal
  46. Buttons
  47. A zine
  48. A miniature collage
  49. Paint colour sample cards
  50. Fold-out origami fortune teller

Saturday, 8 August 2020

Severe M.E Day - Life with Severe M.E, a poem

Today is Severe M.E Awareness Day. It's a day to remember those struggling to live with this illness and to remember those that have lost their life to this illness.

I could tell you my M.E journey but I've already kind of done that so I thought I'd do something a little different. I'm no creative writer but hopefully this will share with you a little about life with M.E

Myalgic Encephalopathy...

My life has been turned upside down
You can't see it, but I feel it
Anger, upset, frustration all the emotions I have felt and more
Little things in life become the big things
Grief for the life I once had
I am defined by my illness but it is not the sum total of who I am
Cure, something we all hope for but more funding is needed

Exhausted of being exhausted
Never knowing what symptom will hit me next
Closed off from the outside world
Endless plans cancelled 
Pacing your way through the day to minimise the crash
Hope is the thing I cling to; for better days to come
Although my life is different to the one I had planned I rebuilding a new one
Loneliness, looking at the same few walls most days
Occasions remind me of the lost years and more lost years to come
Pain, I can't remember what it's like to be pain free
All the days and nights blur into one
The clock ticks by and I just take each day step-by-step
How I hate being ill yet I am grateful for what M.E has taught me
Years go by with my life on pause, hopefully one day it will play again

A teal sofa with a caucasian woman with short brown hair sleeping with a grey blanket over her blue to green gradient square with 'M.E: Severe M.E Day August 8th' and below the square it reads the member tham, remember ME

Tuesday, 4 August 2020

Review: Relax Melodies app

Relax Melodies is a great aid to sleep and daytime naps with a variety of features including meditation, stories and a melody composer.

Meditations

There is a wide variety of meditations to choose from including mindfulness, progressive muscle relaxation, hypnosis, body scanning and visualisation.

The '5 Nights of Total Relaxation' (which is available on the free access of the app) is informative and each night it guides you through different types of relaxation and meditations. This is great if you're new to mindfulness.

Some of the meditations you get the choice of either a female or male voice, others are just automatically chosen. Different meditations have different voices some I preferred over others. In the settings there is also the option to change the language to French.

One good feature is the ability to favourite meditations so you can quickly go to the ones you prefer; you can also download mediations for when you're not going to have internet access. 
There is also a filter to find particular meditations such as 'sleep faster'. 'relaxation', 'insomnia' and 'tinnitus'. There are also meditations for children also for some who benefit from ASMR. Whilst I don't personally benefit from ASMR with my hypersensitivity to noise at times listening to a whispered meditation does help.

Some of my favourite meditation that I enjoy include:
● Walking woodland visualisation
● Grounding meditation for anxiety 
● Healing waters for pain relief - this really helped me get a different perspective on pain
● 5 nights of gratitude
● Ocean visualisation
● Relaxing nap

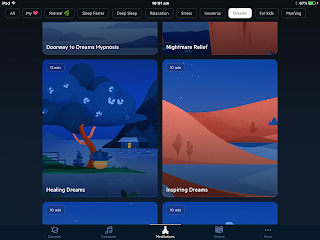
Screen shot of the melodies page of the app Screen shot of the melodies page of the app 

Nap Time Meditations

The nap time meditations are good for getting a refreshing rest during the day. The '5 Days of Napping' is another informative meditation series providing information such as getting into a nap time routine and when is best in the day to take a nap.

Melody Composer

This is probably my favourite feature. I enjoy composing different melodies to suit where I would like to take my mind some sometimes it might take myself into the garden on a breezy day, or to the ocean, or to the city on a rainy day or in the forest.

You can also slide on each sound how loud or quiet you want that particular sound to be to make the perfect mix.

As well as sound effects there is music such as soft piano music, orchestral music, windpipes, and synthesiser music. Under the mixes you can also find 'Sound Journeys' which are 'curated soundscapes inspired by the natural world'.

Some of the music on the composer play at a Solfeggio frequency, for example 'Mood Balance' plays at a frequency of 639Hz. I asked Relax Melodies about this and they explained that this is their healing music range and that the frequency when listened to has healing properties. Some of their healing music includes: 'Emotional Release', 'Raise Energy', 'Energy Cleansing' and 'Anxiety Healer'. To find out more follow this link which will direct you to their blog. (It's quite interesting to read).

Your melody can also be put on timer so if you're having a half hour rest or going off to sleep you can set the timer and the music will fade out and you can also opt for the app to close once the timer has finished.

What I like most about this feature is that it can be used at any time of the day and it's very versatile. I can listen to relax or whilst I'm doing some gentle yoga or whilst I'm crafting as it doesn't take any concentration and it's very relaxing and soothing.

You can also save your favourite mixes and you can give the mix a name to return back to another time and these can be found. You can also submit your mix for other users of the app to listen to and you can find mixes by others also.

   Screen shot of some of my saved melodies on some of the soundscapes you can listen to

Stories

Last night for a change and to try them out I listened to a short story. It was quite relaxing and an enjoyable short story; around half and hour long with a soundscape to go with it which I was able to continue listening to once the story had finished and I eventually nodded off. 

I've been listening to the stories a little more. I quite like the fantasy and fairytale stories and I like how each story has it's own soundscape.

There is a wide variety of stories including non-fiction, 3D poetry, and ones for children. They also vary in length from 20 minutes to an hour.

The stories are a nice alternative to actively listening and engaging in a meditation.

Screen shot of some of the stories page on the app

Other Features

Breathing Exercises 

This is a great visualisation to learn some different breathing practices which can be done at any time.
 
Screen shot of a breathing exercise on the app

Sleep Move

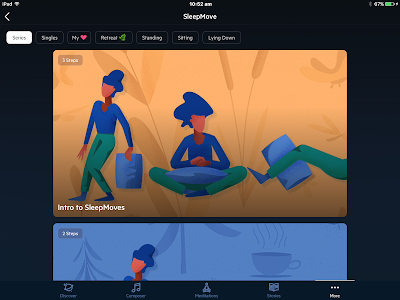
This is another feature of the app that I enjoy. It guides you through some either seated or supine movements to stretch out and relax the body ready for sleep but I've actually used them in the day as a form of gentle exercise.

Screen shot of the sleep moves page of the app


Alarm

This can be set to go off in the morning and progressively gets louder. You can chose from traditional alarm sounds or from one of your mixes.


Other features

● Clock
● Bedtime reminder
● Connection to Apple Health


Final Thoughts

It would be nice if some of the voices on the stories and meditations could be improved and for there to always be a male/female voice option.

More stories for those using the free version of the app.

I love being able to compose my own melodies.

I like the wide range of meditations I can listen too but again it would be nice for there to be a small wider selection of those who are using the app for free and for these to be changed every-so-often.

It would be nice if some of the meditations had their own soundscape like with the stories, especially the visualisation meditations.

The website was okay-ish to navigate once I was familiar with where things was located. However an improvement I would strongly suggest would be be to make text larger or for it to make compatible with the device's visual accessibility settings.

Next would be to have a search bar. I know there are are already subcategories but being able to search for 'rain' in sounds or 'self-love' or 'body scan' in the meditations. I would also make the Sleep Moves a key category.

Lastly despite the app being up-to-date the 'Discover' page was always blank so I wan't able to see the latest updates. I also found it impossible to download new sounds unless I went onto my account on my laptop.

Overall I have really enjoyed my month of premium access to right this review and there are many feature that I love but to continuing paying for premium membership would be something I would have to think about.

Graphic of a man in bed at night with the Relax Melodies logo featuring a moon. Text reading thank you to Relax Melodies for giving me a free month's access to write this review.

Saturday, 1 August 2020

August's Monthly Make - Crochet Glasses Case with video

Three photographs or a great crochet glasses case with a pink button photographed at different angles. Some photographs are also pictured with a pair of glasses.

This month's Monthly Make project is a simple crochet glasses case. Perfect for your sunglasses this summer or to keep your glasses safe in your handbag. You can also use for other things such as a pencil case or to store your crochet hooks. It also makes the perfect gift - I've just made one for a friend for her birthday in a multicoloured yarn.

Difficulty levels: ★ ★ ☆  (Intermediate) 


Materials

  • 5mm crochet hook
  • 5mm yarn (I've used on this project Drops Paris Uni Colour yarn)
  • Medium - large button
  • Needle and thread
  • Scissors
  • Notebook and pen (to keep count out your rows)

Abbreviations

(UK pattern)
  • CH - Chain
  • ST - Stitch
  • SL ST - Slip stitch
  • HTR - Half treble crochet
  • DC - Double crochet
The stitch for this project is Even Moss Stitch ← Tutorial in link
This stitch alternates between SL ST and HTR

Front Piece

CH 12

Row 1

Turn and miss the first CH and HTR then Sl St into the next and continue with Even Moss Stitch (HTR, SL ST, HTR, SL ST and so on)

Rows 2-25

Continue as you did in Row 1 until you have 25 rows

Edging

After completing all 25 rows CH 1 and DC around the whole piece: top, bottom and sides remembering to do 3 DC in each corner
Creating a total number of 78 stitches

Tie off and cut

Back piece

As you did with the front piece do the following...

CH 12

Row 1

Turn and miss the first CH and HTR then SL ST into the next and continue with Even Moss Stitch (HTR, SL ST, HTR, SL ST and so on)

Rows 2-30

Continue as you did in Row 1 until you have 30 rows

Edging

After completing all 30 rows CH 1 and DC around the whole piece: top, bottom and sides remembering to do 3 DC in each corner
Creating a total number of 88 stitches

Tie off and cut

Assembly

Put both piece together with the front piece on top of the back piece

Start from the bottom left corner (the middle SC in the corner) and start from here

DC along joining both pieces together

When you get to the end of where the two piece come together continue stitching DC along the back piece

At the top of the back piece DC 6 stitches, CH 6 to make a loop for your button (for a larger or smaller button you may need more/less than a chain of 6 - just test your button out to work out how many CH ST you need)

Continue on the next ST around the edge of the back piece

When you come to the part where the front and back piece meet again continue to DC both pieces together until you reach where you began

Tie off, cut the yarn and weave in the ends

Suggestion

If you wish you could use a different yarn to assemble your two piece together

Button

Find the correct spot on the front piece for where your button needs to be placed and used and needle and thread sew the button in place

Video Tutorial

Click video to watch on YouTube