
 |
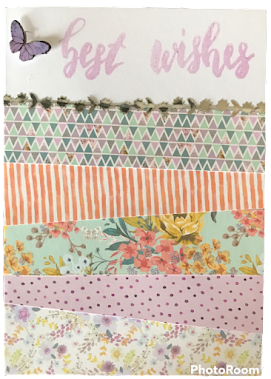
| Card example |
Difficulty rating: ★ ☆ ☆ - Total beginner
What you will need...
- Blank card and envelope (any size)
- Co-ordinating patterned scrap paper (or card) - perfect if you're coming to the end of a paper pad (your paper needs to be longer than the width of your blank card)
- Sentiment - this could be a stamp, sticker, die cut, hand lettered etc
- Either a paper trimmer or a ruler and pencil
- Scissors
- Glue - liquid craft glue or just a normal glue stick
- Border sticker or alternatively you could use ribbon, washi tape, a very small strip of plain or shiny or glitter card or something similar
How to make the card...
1. Cut your scrap paper into strips
Cut your scrap paper into 2.5cm (1 inch) strips. You'll need around 5 or 6 strips depending on the size of your card and the sentiment at the top.
If you're using a small blank card you may want to cut thinner strips or vice versa with a larger blank card you may want to cut slightly wider strips, say 3cm unless you want a wider variety of patterned paper strips.
2. Place your sentiment at the top of the card
You don't have to place your sentiment first but I find it helps me to work out the placement of my paper strips and also the border that I'm going to add between the top paper strip and the sentiment.
3. Work out what order you want to place your paper strips
Before gluing down your paper strips play around and work out what order you would like to place down your paper strips.
The first strip of paper is placed along the bottom of the card and the rest of the strips will be placed at an angle.
Tip: Take a photo so you can recall what order your strips will be placed in
4. Glue down your paper strips
If you're using liquid glue, glue down along the bottom of your card and also up the sides of the blank card front.
On the first strip of card place a line of glue along the top and lay it along the bottom of the card.
With the other paper strips glue a line along the top and bottom.
5. Add your finishing touches
Along the top of you last strip of card place a border to finish off. This could be a border sticker either one with a pattern or a plain or glitter border sticker. Alternatively you could use ribbon, thin washi tape or a very thin strip of metallic or glitter card as a few ideas.
If there is room you could also add an embellishment such as a name, a sticker or like I used a 3D butterfly card topper.
Ways you can adapt this card...
Some cards I have made as shown in the video tutorial below, other times I have used a sticker or die cut sentiment or used alphabet stickers or stamps to personalise the card.
I've also used different sized paper strips depending on the size of the blank card I'm using.
Another thing I have done is to completely cover the blank card front in paper strips and then mounted on top a sentiment which I had stamped onto white card mounted onto coloured card that complimented the colour of the paper strips and then stuck it on the card using 3D adhesive foam.
The many possible ways you can finish or adapt this card are endless!
No comments:
Post a Comment